This super simple badge is the perfect accessory for any little girl. Everyone I have made them for LOVES them.
You will need:
fimo - I choose to use four colours
badge back
grease proof paper
hot glue gun
oven
knife
rolling pin
a hard surface to work on, I used a plastic chopping board
1. First place one colour of the fimo between grease proof paper and roll into a snake, repeat for each colour.
2. Starting with the darkest colour create a narrow arch, then working darkest to lightest place the other coloured fimo snakes around the outside of this arch to create a rainbow.
3. Cover with grease proof paper and gently roll with the rolling pin.
4. Then using a knife cut the uneven ends off.
5. Bake using manufacturers instructions to harden.
6. Finally hot glue gun the badge in place on the back of the rainbow.
It is getting towards the end of my current veg growing season in the garden. So I thought I would up date you on what has happened.
It was a long dry summer and we had mixed success.
The positives were the greens and herbs (I can't recommend growing these enough!), tomatoes especially the cherry ones which Mima ate straight off the plant and carrots.
I was so excited to pull up these rainbow carrots the other day.
I have never grown carrots before, but decided to give them ago and grew them from seed. Mima helped water and harvest the carrots, the process gave Miffy's Garden, which is about growing carrots, a new importance, this weeks favourite book.
We used them to make the Petite Kitchen lamb shanks stew totally delicious!
The disasters were courgettes, sadly our plant got powdery mildew and gave it to our corn. Check out the POD gardening page if you are interested in knowing more.
Over winter we will continue to grow herbs and greens. So far I have planted seedlings (kale, spinach, swiss chard, parsley) but will add some seeds in the next week or two.
for Moo and her tribe of mischief mates...
DIY Feather Headdress
You'll need:
Large white feathers x5
Assortment of small coloured feathers 8 -12
Buttons and sequins - whatever else you feel like decorating with
25mm wide x 90cm long ribbon or grosgrain tape
15mm wide x 30cm long ribbon or grosgrain tape
Needle and thread
Craft glue
Sewing machine
Method:
Fold your 25mm ribbon in half to find the centre front for your headdress.
Place the white feather evenly along 15cm in the centre of your 25mm ribbon, stick down with a little craft glue.
Place coloured feather over the white ones extending out to the sides a further 5cm, stick down with craft glue.
Place 15mm ribbon over the top of the feathers, fold raw ends under 5mm and stick in place. Stitch over the top of this ribbon to secure all the feathers.
Now decorate by glueing on your buttons and sequins. You may want to hand stitch these to make them less likely to fall off.
Keep the ribbon ends long to tie up behind your head.
Last week we had Mima's room painted, a lovely pale grey-blue colour. I wanted to create a new light shade for the center of her room, and thought a cloud would be perfect.
Here it is...
To make one you will need:
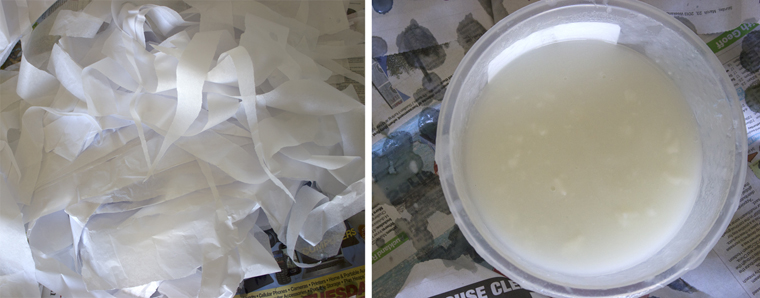
LOTS of white tissue paper
white balloons - I used eight
double sided tape
vaseline
string
wallpaper paste
the top wire hoop and central hook from a paper lantern, you need to connect these two parts. I bent the wire around the hoop and then covered the wire ends with tape.
1. First blow up all your balloons and arrange them to create a cloud-like shape. I used small pieces of double sided tape to connect the balloons.
2. Tie the string to a hook on the roof, then slide the top wire hoop from a paper lantern on to this string, and tie the other end of the string to a balloon end within the cloud. The wire hop should sit snuggly at the top of your cloud.
3. Then tear your tissue paper into strips and mix up your wallpaper paste (it would be good to do this in an ice cream container or something that you intend to throw away).
4. Grease the balloons in a thin layer of vaseline.
5. Then start placing glue covered strips of tissue paper on the balloons. Starting at the top wire hoop, you need to make sure this is securely in place, so wrap strips of glued tissue around the wire and back onto the balloons. Completely cover the balloons in a few layers of tissue.
6. Leave it hanging for a couple of days to completely dry. Then using something sharp pop the balloons and remove them. I crumpled the shape a little to make it more cloud-like.
Hang it up and enjoy.
At home today feeling a bit under the weather, wanting a snack but lacking energy when I remembered I made my first batch of Almond Butter a few days ago. So good on slices on apple with a squeeze of lemon for a yummy and nutritious snack.
I used the recipe of My New Roots but it's as simple as roasting raw almonds and blending until they turn in a paste. I added a dash on sesame oil to mine as the consistency was little hard.
Delicious and half the price of store brought almond butter.